
Sales Assistant Setup
The Sales Assistant runs your Instagram drops for you — reading bids, replying to comments, and sending winners their checkout links. Here’s how to get it set up in three steps.
- 1. Complete Stripe onboarding so you can take payments.
- 2. Connect your Instagram account (and set your caption voice).
- 3. Customize your settings — bidding, Buy It Now, comment automation, and checkout.
Step 1: Complete Stripe onboarding
The Sales Assistant collects payment through Thryft Ship Payments (powered by Stripe), so finish Stripe onboarding first. If you haven’t set that up, see the complete Payments guide.
Step 2: Connect your Instagram account
Link the Instagram account you sell from so the assistant can read comments and reply on your behalf. This is also where you set your caption voice — the tone the assistant uses when it writes your post captions. More on that in How Captioning Works.
Step 3: Customize your settings
Open your Sales Assistant settings and set your defaults. These apply to every new drop (you can still change them per drop).
Prefer to watch? Here’s a quick video walkthrough of setting up your settings.
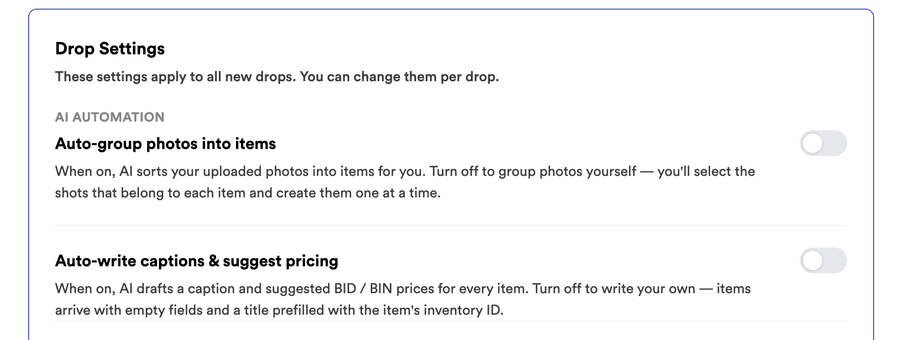
Drop Settings
Your drop defaults live under Settings → Sales Assistant, in a section called Drop Settings. They apply to every new drop — and you can still change them per drop. (If you used Thryft Ship a while ago, this is what used to be called "Default Sales Settings.")
AI Automation. Two parts of a drop can be handled by AI, and each has its own on/off switch — so you're always in control:
- Auto-group photos into items. On: AI sorts your uploaded photos into items for you. Off: you group them yourself, choosing which shots belong to each item and creating them one at a time.
- Auto-write captions & suggest pricing. On: AI drafts a caption and suggested BID / BIN prices for every item. Off: you write your own — items arrive with empty fields and a title prefilled with the item's inventory ID.
Turn either one off any time you'd rather do that part by hand.
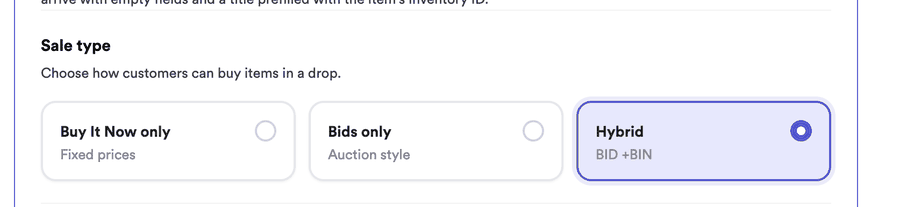
Sale type. This is how you choose the way customers can buy items in a drop. Pick one:
- Buy It Now only — fixed prices, no bidding.
- Bids only — auction style; customers bid and the highest bid wins.
- Hybrid — both a bid and a Buy It Now price on each item.
How long auctions run. When bidding is part of your sale type, this sets how long each item stays open for bids — 6, 12, or 24 hours.
Delay BIN invoices until drop ends. Off by default, so Buy It Now invoices send immediately. Turn it on to hold them and send them together with your bid-winner invoices when the drop ends.
Smart Extend (Anti-Sniping). Optional. When a bid lands in the final minutes of an item closing, bidding on that item extends a little so serious buyers get a fair shot — see How Smart Extend Works for the full rundown.
Checkout & reminders
Payment deadline. How long a customer has to check out after they win — up to 48 hours. After that, unpaid orders are marked expired.
Payment reminder DMs. Turn these on to nudge customers who haven't paid. You choose how many hours after the customer wins the reminder goes out, and you can edit the message.
Open bags. Let customers keep shopping and pay for everything together later. Winners see a Checkout and an Open Bag button; you can set how long a bag stays open (from one week up to eight, or never-expiring).
Allow local pickup. Let customers pick up in person and skip shipping entirely.
Common questions
Do I have to use bidding?
No. Turn bidding off and run fixed-price or Buy-It-Now-only drops instead.
How long can a winner take to pay?
You set the payment deadline — up to 24 hours after they win.
Can I change these settings per drop?
Yes — these are defaults; you can adjust them when you create a drop.
Stuck on setup? Reach out anytime — we’ll get you running.